A leaking faucet or improperly installed faucet can turn a simple RV kitchen chore into a daunting plumbing problem. That’s because RV kitchens have limited space and unique plumbing. When you’re picking the right faucet, you’re doing more than picking the faucet’s design.
When looking for the ideal RV kitchen faucet, the right one should be a match for the sink, compatible with the existing water connections, and be compatible with the water pressure system in your RV. Whether replacing a leaking kitchen faucet, installing new kitchen sink faucets, or just comparing the bathroom faucets and bathroom sink faucets, having the right fitting is extremely important. No matter if you’re using a motorhome, travel trailer, fifth wheel, or camping, learning about common dimensions of faucets and their fittings, installation, and maintenance techniques will offer you more informed and confident decisions.
This blog highlights some of the types of RV kitchen faucets, mounting varieties, plumbing connections, pressure problems, installation needs, winterizing procedures, and indicators pointing to the requirement for a new RV kitchen faucet.
Why Choosing an RV-Specific Faucet Matters
Although RV faucets look like regular household plumbing, RV plumbing systems are geared towards mobility. There is limited space, parts that get shaken up during the trip, and sources of water may include onboard reservoirs and pumps or campsite city water connections.
Most RV kitchen sinks operate on plumbing connections specific to RVs. Depending on the faucet and type of RV, the connection could be a ½” male pipe thread, as in the case of MPT and NPT plumbing fittings, or a different type of fitting for the specific replacement faucet.
Household faucets may use compression connections, for instance, 3/8 inch fittings. This does not mean that these fittings cannot be utilised in RV systems, but an additional connector may be needed to accommodate the difference in connection type. Before purchasing an adapter, always check the fitting on the faucet as well as on the water lines of your RV.
Types of RV Kitchen Faucets
Grasping the different types of faucets will assist with your faucet selection.
Single Handle RV Faucets: Single handle faucets are faucets that combine both hot and cold water control into a single handle, making it easy, as the user does not have to use both hands. It is best suited for small kitchens.
Double Handle RV Faucets: Double handle faucets are the best choice if one needs to have hot and cold water in separate handles. The faucet is fitted with a traditional design making it easy to switch the faucets.
Pull-Out Faucet: The pull-out faucet comes with a removable head that extends toward the sink, thus making it easier to wash off dishes.
Pull-Down Faucet: The pull-down faucet contains a head that moves down towards the sink. This means the faucet can be lowered and moved freely, but there should be enough height for the faucet.
High-Rise Gooseneck Faucet: These types of faucets fill containers at a higher height. Thus, it is important to check if your containers can fit under the faucet before choosing the model.

What Faucet Mounting Configuration Does Your RV Need?
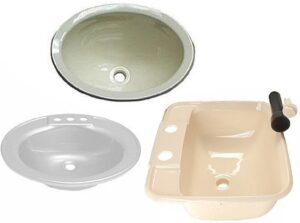
Mounting-hole configuration is an important detail when buying replacement kitchen sink faucets or bathroom fixtures. Most of the RV kitchen sinks, either built-in or free-standing, have a 4- or 8-inch centerset configuration, whereas standard sinks and countertops can have a single-hole configuration. Besides, some single-hole faucets can be installed with a decorative escutcheon or deck plate that hides holes that are not used.
Before placing an order for a new faucet, it is necessary to know how many mounting holes the existing faucet has, as well as the distance between the centers of the holes. If one wants to replace both the sink and the faucet, he or she should ensure that the specifications of both products match.
The same measurements matter when replacing bathroom sink faucets. If the faucet does not align with the existing holes, you may require an adaptor, extra hardware, or changes to the countertop.
Understanding RV Faucet Water-Line Connections
The compatibility of water lines should not be overlooked. Most RV plumbing systems incorporate 1/2-inch tubes and fittings, while a certain number of taps come with a 1/2-inch male pipe thread. Residential taps are likely to have a 3/8-inch connection as per model specifications.
The conversion from a residential tap to a tap connected to RV plumbing is achieved by using an adapter that transforms MPT (1/2 inch) into compression (3/8 inch). However, the right choice of adapter will depend on the upcoming connection method.
Do not choose an adapter based on fitting size alone. Check whether the fitting is NPT or NPSM, as they seal differently. If unsure, follow the manufacturer’s guidelines or consult an RV plumbing professional.
Why RV Water Pressure Matters
The performance of a faucet and the safety of plumbing can be compromised by water pressure.
The pressure of many RV freshwater systems is typically between 40 and 50 PSI. However, adequate water pressure can vary for different types of RVs and their components. Sometimes water pressures at the source in campgrounds can exceed these numbers, damaging the components of the plumbing system of an RV or faucet valves.
The RV water pressure regulator installed inline can reduce the pressure of the water supplied to the plumbing before it reaches the components of the plumbing system. Install a water pressure regulator for RV that complies with the RV manufacturer’s specifications.
If you observe that the flow from a faucet is significantly lower or higher than normal, it does not necessarily indicate a problem with the faucet. One should examine the water source, water pressure regulator, water pump, aerator, filter, and water supply lines if required.
What to Check Before Buying an RV Kitchen Faucet?
Before buying new kitchen sink faucets, be sure to study the following criteria:
- Number of mounting holes.
- Space between the faucet holes, measured in either four or eight inches.
- Whether it is compatible with single-hole faucets and if a deck plate is required.
- The height and the span of the faucet spout.
- The type of connection pipe and its diameter.
- The space in the cabinets and above the backsplash.
- The distance from the sprayer hose to the other objects.
- The water pressure of the RV in which the product will be installed.
Moreover, if you purchase RV sinks and faucets at the same time, compare the characteristics of the two products.
Tools Needed for RV Kitchen Faucets Installation
To replace an RV kitchen faucet, one has to use simple plumbing tools.
- a basin wrench
- adjustable wrench
- channel-lock pliers
- screwdrivers
- a bucket to catch any dripping water
- towels to wipe up any spills
Sometimes plumber’s tape or thread sealant is required to make the connection tight, but it must not be applied to compression fittings, as they do not need it to form a seal. It is essential to consult the fitting or faucet manufacturer’s manuals.
Installation Process of an RV Kitchen Faucet
- Disconnect the RV from the city water source and turn off the onboard 12V water pump.
- Run the faucet for a while to release pressure, and have a towel and bucket at hand.
- Take off the old faucet and clean the mounting area.
- Fix the new faucet in the available opening and follow the manufacturer’s instructions for installation.
- Connect the cold and hot water pipes with the correct fittings.
- Reconnect the water supply and check each connection for leaks.
- Turn the hot and cold water taps on and examine the new installation and the bottom of the sink.
If there is a need to change the plumbing or there are some issues with fittings compatibility, call experts to prevent water leakage and other problems.
Maintenance of RV Kitchen Faucet
Wipe the faucet with a clean, soft cloth and an appropriate cleaner for the finish.
Avoid using any abrasive solutions that may scratch the surface.
If you notice a pressure drop, try to see if there are any deposits or debris in the aerator, and either clean it or replace the aerator to restore the flow of water.
Every time you inspect the base of the faucet, knobs, pipes, seals, and connections, look for signs of moisture, rust, loose parts, and constant dripping.
These maintenance tips apply to both kitchen sink faucets and bathroom faucets. If you regularly check your RV sinks and faucets, you will be able to spot a leak early enough to avoid more severe issues.
If a cartridge, seal, hose, or other component fails, it will be cheaper to repair it rather than replace the whole faucet, assuming the faucet body is not defective.
Signs to Replace Your RV Kitchen Faucet
You should consider buying a new faucet if you notice that it is:
- constantly dripping,
- broken,
- highly rusty,
- damaged hose
- cartridge issue even after cleaning the aerator
- the faucet stops working as intended.
Before you replace the whole structure, make sure that the problem is not in the cartridge, seal, hose, or fitting that can be simply replaced.
The same goes for bathroom faucets. Make sure that the part you want to replace is not working properly due to some other issues.
RV Kitchen Faucets and Sink Compatibility
When installing the RV faucet and sink, you need to treat them as a unit. See what mounting hole positions the sink has available, countertop thickness, basin size and arrangement, faucet clearance, and water pipe configuration.
The installation of a single-hole faucet on multiple holes requires a correct choice of deck plate or escutcheon size so that no undesirable gaps appear.
In addition, a high faucet can be unsuitable if it interferes with a lower cabinet or protrudes too far beyond a narrow basin.
How to Protect Your RV Faucet During Freezing Weather?
When frozen water occupies an RV plumbing system, it expands and damages the plumbing system. Hence, it becomes important to winterize the plumbing system when the RV is stored in cold weather. A dripping faucet alone is not sufficient. A proper winterization is needed.
The two common procedures to winterize RV plumbing systems are compressed air blow-out or pumping nontoxic RV antifreeze through the system. While using compressed air, the manufacturer’s limits should be followed, and it is advisable to maintain pressure below 30 PSI to avoid damaging the plumbing system. In case the antifreeze method is used, ensure that only the products meant for RV water plumbing systems are used.
In case the RV is being used during subzero weather, the approach may need to be slightly modified. Again, it is important to refer to the manufacturer’s guides for protecting the plumbing system, including bathroom sink faucets and other fixtures.
Final Thoughts: Make Your RV Kitchen More Functional
A good quality RV kitchen faucet can make your life simpler while helping you get more use from a compact kitchen. Choosing a kitchen faucet is a challenge because there are several other factors to take into account besides the beauty and comfort of use.
For example, the distance between mounting holes, the size of a hole in the countertop, height and length, type of water-source connection, and water flow and pressure requirements are also important.
Always turn off the city water supply and internal pump, use the right parts, and check if everything is properly assembled and there are no leaks. A faucet with a few openings, despite the fact that it is suitable for use in the warm season, will not be enough during the winter storage season. Whether it is a replacement of kitchen and bathroom faucets or purchase of RV sinks or faucets for the whole interior design project, compatibility issues should still be taken into consideration.
Are you ready to upgrade your RV kitchen? Choose one of RV Parts Center’s RV kitchen faucet collections and upgrade your RV with a high-quality sink, faucet, accessories, and freshwater plumbing materials.

